Friday, June 8, 2012
Project: Bus Pirate Case
I bought a Bus Pirate v4 with a recent PCB purchase from Seeedstudios Fusion PCB service. It is an awesome open device for debugging, prototyping and hacking hardware that was created by Dangerous Prototypes.
The Bus Pirate is sold as a bare board, which puts it at risk of shorts from messy work surfaces with conductive things like paper clips and staples laying around. I've decided I really like this device, so I figured I'd make a case to protect it.
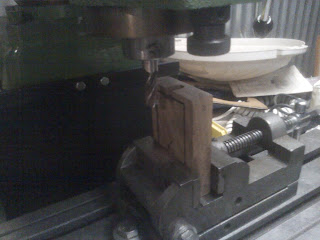
It just so happens that I recently joined Xerocraft -- our new Tucson hackerspace. We have a milling machine that I have been working with, I decided to use it to mill a case out of hardwood.
I bought a small chunk of maple at a hardwood supplier and took it to the hackerspace to mill it out. I set the mill spindle to run at about 600 RPM (too fast burns the wood), and mounted a 1/2" end mill in a 1/2" R8 collet.
I cut an appropriately sized piece of the maple with a hand saw (which took some effort - this is some hard wood).
Next I manually milled a cavity of the appropriate size in the piece and cut a slot for the USB connection during Thursday open hours. This left me with a roughly shaped part, however, because of the size of the end mill I used, I had rounded inside corners instead of squared off corners that would fit the board.
I tried a few things to get the corners squared off - an oscillating tool with a basic plunge blade was the first thing I tried. It cut well, but was a bit too hard to control. I found that the best tool was a sharp chisel and a bit of patience.
I finished shaping it with a palm sander, then used a fine sandpaper to prepare it for staining. I used a bit of stain, then a couple coats of polyurethane to finish it.
Once it was dry and looking good, I drilled appropriately sized mounting holes for #4 machine screws all the way through the bottom of the case, then tapped the hardwood for the mounting screws.
I used four nylon #4 machine screws and nylon spacers to mount the board directly into the cavity. The screws I used are longer than I needed, but nylon is easy to cut cleanly, so I screwed the board in all the way and marked where they extended through the other side. I pulled the screws out one by one and cut them to size just a little shorter than the mark.
The final case is quite functional and I think a step above the usual project case in looks. The dark stained maple has a nice contrast with the red circuit board.
I was originally thinking I would put a clear acrylic top on the case, but I've found it is not really necessary. I may do that later, but for now, I'm very happy with the results.
I also printed a label with the pinout and pin assignments and stuck it on the bottom of the case for easy reference.
I think I'll make a similar case for my Open Workbench Logic Sniffer board next (another awesome Dangerous Prototypes project). I'll try to remember to take some photos at each step of that project.
I'm also planning on expanding a bit more about how I am using both the Bus Pirate and logic analyzer in future posts.
Subscribe to:
Post Comments (Atom)


No comments:
Post a Comment